Project Introduction
In order to test miniservice functions I decided to build a smart sensor able to connect to the internet and to store in the miniservice platform a temperature value collected every X mins.
The development of such similar component allowed me to test the stability of the code built to run miniservice platform, the stability of the database and the high availability of the infrastructure.
Important Notice: The Miniservices infrastructure by BVRobotics described in this page is no longer available. This page is kept for historical and educational purposes to show how IoT devices can be built using ESP8266 and Arduino. The code examples and hardware setup information remain valid for building similar IoT projects, but you will need to adapt the code to use alternative cloud services or your own backend infrastructure.
Development Environment
Initially, to build an easy IoT device using my competences I chose to continue to use the arduino IDE. Arduino IDE is easy to use, is C++ compliant, manages a great amount of prototyping boards and has a tremendous amount of libraries built to integrate a massive set of devices.
In order to work with the Arduino framework you can use both the standard Arduino Framework or different additional IDE like Platformio or Visual Micro.
If you want to better understand what is an Arduino IDE see my tutorial.
If you need some instructions on how to manage libraries in Arduino framework see here.
Hardware Selection
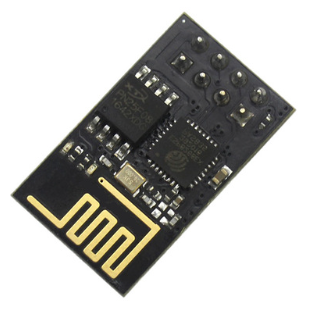
Once decided the framework and the development environment, you need to select a valid device to use for your application. You can decide to use a standard arduino board adding wifi capabilities or you can decide to use a board with a wifi module integrated directly on it. In both cases the chipset to use to connect to a wifi APNs is an ESP8266. This chipset family is the most common one to build integrated IoT application. Obviously, for such similar chip you will find toons of libraries available on internet ready to be installed and to be used in your project.
If you decide to use an Arduino board you need to buy a separate ESP8266 component that you will connect to the TX and RX channel of your arduino. The ESP8266 board acts exactly as a modem. It connects with a serial port and receive AT commands in order to activate the TCP layer to use to run protocols like HTTP, FTP and so on.
This configuration is more stable because it allows you to use all the power of an arduino board (memory, pins, libraries, features etc.). On the other side there is an important consideration while connection Arduino with the ESP 8266 board. The first one (except for some models) works with 5V on TX and RX pins. The second one (ESP 8266) works with 3.3V. For this reason, in theory, you should never connect those two components directly. You should use a voltage divider or a bidirectional component able to reduce the voltage in one direction and increase it in the opposite one.

Once this issue has been solved then, you will realize that this is the solution that gives you more flexibility and capability in term of sensors and connections you can use contemporary.
In case you need to build a basic IoT service with just one or two sensors or with a sensor and an Oled display (for example) then there is an easy solution. You can use a board called: "NodeMcu"
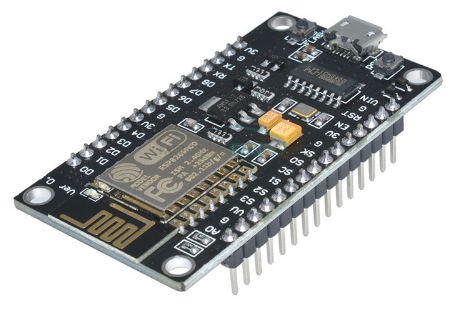
NodeMCU Solution
To perform my tests, the solution based on a nodeMCU board was the perfect one. Using this board you have everithing already built in and you can use the arduino development environment as for any other card.
The Miniservices by BVRobotics infrastructure makes you available a basic firmware and all the needed instructions to install it on this board. Using this pre-configured firmware you will no need to write one line of code to interface your sensors directly with the Miniservice platform and will be able to run your device from internet for free thanks to the BVIotManager application.
To retrieve the right temperature, the sensor I used is a DHT11, but you can use also a DHT22 (more detailed) or any other sensor. To download this library you can use our Download area
Firmware Development
If you want to build a more complex firmware on your own and use, in any case, the Miniservice infrastructure you need, in any case, to use the right libraries. Your code will need to include the following headers:
#include "ESP8266WebServer.h"
#include "ESP8266WiFi.h"
#include "dht11.h"
#include "ESP8266HTTPClient.h"
The first version of the IoT firmware can be very basic (If you do not want to use the pre-defined firmware available in the Miniservice platform). I, personally, decided to not use any Oled Display to show the connection status. I simply used two leds a white one and a red one.
The algorithm is very easy and uses the EPROM chipset installed on the board to store configuration data.
Start and retrieve the APN information stored into the EPROM of the NodeMCU
Try to connect to the APN
IF YES then activate the white led and start sending information every five minutes to the Miniservice temperature service
Activate a web server and if requested display the same temperature you read
IF NO then activate the RED led and start your APN (became an access point)
Open a web server and wait for a connection
Once a connection has been estabilished then ask for a new APN and a new password and store these info into the eprom
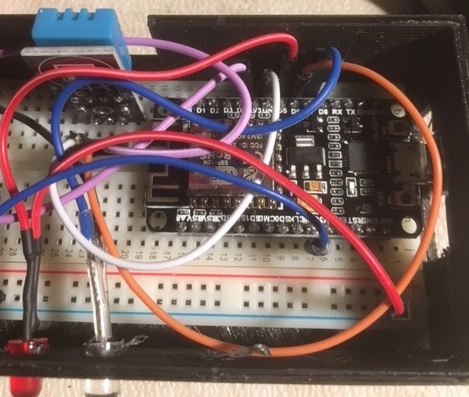
reset the board and start from scratchConnections and Case
The connections look like in the following picture:
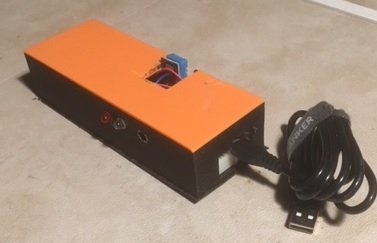
The IoT device fits perfectly in a case I draw and printed with my printerina 3D printer. If you want you can download the STL files from our Download area
Code Examples
This is a function I built in order to test if the wifi connection, using the settings stored in the EPROM, has been successufully performed:
bool testWifi(void) {
    int c = 0;
    WiFi.begin(esid.c_str(), epass.c_str());

    Serial.println("Waiting for Wifi to connect");
    while ( c < 20 ) {
        if (WiFi.status() == WL_CONNECTED) { return true; }
        delay(500);
        Serial.print(WiFi.status());
        c++;
    }
    Serial.println("");
    Serial.println("Connect timed out, opening AP");
    return false;
}
Here the function you can use to send to the temperature Miniservice an auth request to receive a token used to store the temperature:
String BuonevacanzeAuthenticate() {
    String SendString, payload, StrToken;
    HTTPClient http;
    SendString = "http://www.buonevacanze.org/approver/default.aspx?PCC=" + ObjectCode + "&&APP=" + SVCTemperature + "&&TAG=0&&LANIP=" + WiFi.localIP().toString();
    Serial.println("Sending = "+ SendString);

    //Send Data to Buonevacanze
    http.begin(SendString);  //Specify request destination

    int httpCode = http.GET();                                                                  //Send the request

    if (httpCode > 0) { //Check the returning code
        payload = http.getString();   //Get the request response payload
        StrToken = xmlTakeParam(payload,"Message");
        Serial.println("HashCode: " + StrToken);
    }
    else
        payload = "Not Authorized";

    http.end();   //Close connection
    return payload;
}
Read the temperature from the sensor is very easy:
dht11 DHT;

TempValue = DHT.read(DHT_PIN);

SendMeteoValues(Token,DHT.temperature,DHT.humidity);
Obviously SendMeteoValues Is the function I built to call the Temperature service once you have a valid token to use in this service categhory.
void SendMeteoValues(String Token,int Temp,int Hum)
{
    String SendString, payload, StrToken;
    HTTPClient http;
    SendString = "http://www.buonevacanze.org/approver/temperature.aspx?TOKEN=" + Token + "&&TEMP=" + String(Temp) + "&&HUM=" + String(Hum) + "&&GEO=0";
    Serial.println("Sending = "+ SendString);

    //Send Data to Buonevacanze
    http.begin(SendString);     //Specify request destination
    int httpCode = http.GET();
    if (httpCode > 0) {         //Check the returning code
        payload = http.getString();   //Get the request response payload
        StrToken = xmlTakeParam(payload,"ReturnMessage");
        Serial.println("Result: " + StrToken);
    }
    http.end();   //Close connection
}
Additional Features
As described in the pages dedicated to Miniservices by bvrobotics.com, once those information have been stored you will have available also different services to manipulate them or to simply retrieve data stored in the central DB.
Another interesting functionality (not implemented for this occasion but available as service function), is the one to store a gps position linked to the temperature sent to the infrastructure. In this way you will be able to associate a position to a specific temperature.
Need More Information?
If you have specific questions about this project, please send me an email or leave a comment. I will reply as soon as I will be available.
If you need additional specific information about this topic or if you want to look it personally please write an email.